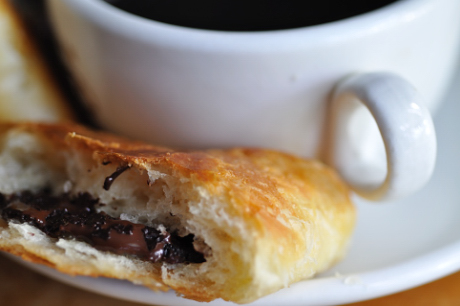
As good as a homemade croissant is, it can’t hold a candle to pain chocolat. Wherever you stand on the chocolate issue, flaky pastry wrapped around a bar of bittersweet chocolate just can’t be wrong. Sadly, unless you happen to live near an authentic French bakery, you’ve probably never tasted a truly fine example of this simple, but heavenly pastry. But, never fear. Once you get the knack of making the dough, this treat is not complicated to make. The flavor and texture is just unbelievable when eaten warm from the oven when the chocolate is oozey. At the first bite you will be transported to the Paris and the rive gauche, where pain chocolat is just a short stroll away no matter what direction you happen to be wandering. For best results, try eating one (or two if you’re feeling naughty) with a really good cup of French press coffee. Bon appétit.
 Kitchen Counter Point: This recipe is a basic croissant dough. In baking circles it is called a laminated dough because the butter is actually sandwiched between many layers. When the pastry bakes, the butter melts and creates steam, which causes the layers to rise and form that delectable flaky texture. Though this dough does take some time to make, it is mostly just rising. cooling or hands off time. I usually begin the process a day ahead and make the pastry through all of the “turns”. After a night in the frig, the dough is ready to be rolled out and shaped into either pain chocolat or butter rolls, your choice.
Thanks to Julia Child and Simone Beck’s Mastering the Art of French Cooking for the inspiration of this recipe.
Makes 12 pain chocolat
1 1/2 cups cold milk warmed in a microwave oven for 45 seconds (bathwater temperature)
1 package (7 grams) dry yeast
2 tablespoons sugar
3 1/2 cups all-purpose flour
2 1/2 teaspoons salt
2 1/2 sticks cold, unsalted butter
Flour as needed
3- 4oz bars bittersweet chocolate, each broken into 4 pieces
1 large egg, beaten with 2 tablespoons water and a pinch of salt
To the warm milk add the yeast and sugar and let sit undisturbed for 5 minutes while assembling the flour and salt. The top of the milk will be foamy and the yeast activated. Stir to dissolve the sugar.
In a large bowl or stand mixer bowl, combine the flour and salt and stir to combine. Make a trough in the center of the flour and add the milk-yeast mixture. If using a stand mixer attach the paddle and mix on speed 2 until the dough is mixed and then change out the paddle to the dough hook and mix on the same speed for about 2 minutes or until it is smooth and elastic. If making the dough by hand, mix the dough until combined with a wooden spoon, turn it out onto a work surface and knead the dough by hand until smooth and elastic, about 4 minutes.
Place the dough in a large (12 cup) bowl and cover with plastic wrap. Set the dough to rise in a warm place (72 degrees) until tripled, about 3 hours. Punch the dough down to deflate it and let it rise again until doubled, about 1 1/2 hours.
Deflate the dough by loosening up the sides with a rubber scraper, recover and place the dough in the refrigerator for a 30 minute chill. This will make the dough easier to work with.
Remove the chilled dough from the refrigerator and turn it out onto a floured surface. Using a rolling pin, roll the dough out into a rectangle measuring 14x 20 inches.
Flour a work surface near the dough and lay out the cold butter with the two sticks side by side and the half stick across the top end to form what looks like two columns with a top. Flour the butter and with a rolling pin or a meat pounder, pound the butter flat, trying to keep it stuck together in one piece until it measures roughly 12x 14-inches. Transfer the butter to the dough covering 2/3 of the dough, leaving a 1-inch border around the edges. (It’s alright if the butter breaks into pieces, just piece it back together on the dough.)
The dough now needs to be folded in to 3 layers (like a business letter.) Start at the edge that isn’t covered in butter and fold the dough up and over to cover 1/2 of the butter covered dough. Pat down to secure it and fold over the remaining butter covered dough. You now have 3 layers of dough covering 2 layers of butter. This is called turn #1
To make second turn, position the dough so that an open end is facing you and roll out the dough with a rolling pin into a rectangle about 18x 10-inches. Brush any flour from the top of the dough with a dry pastry brush and fold it into 3rds as before. Wrap the dough in plastic wrap and place it in a plastic zip lock bag. Store the dough in the refrigerator for 1 hour and then complete turns #3 and #4. Refrigerate again for another hour or let rest overnight to bake off the next day.
To shape the pain chocolat: About 2 hours before you need them, remove the dough from the refrigerator and let the unwrapped dough sit for 10 minutes to warm up slightly. Roll out the dough on a lightly floured surface into a rectangle about 30x 8-inches. Cut the dough in half crosswise and refrigerate the other half while you shape the first batch.
You now have a piece of dough about 15 x 8-inches. Cut in half lengthwise and refrigerate one half. Cut the remaining piece into 3 equal squares and roll them out so that they’re a little thinner. Lay down a piece of chocolate in the center and bring up the sides to cover. Pinch the seam closed and lay the pastry seam side down on a parchment lined sheet pan about 3-inches apart. Continue to shape the remaining pastries in the same manner. You will have 12 pastries total. It is important to keep the dough cold. If it starts to look oily or becomes difficult to work with, return it to the refrigerator to firm up.
Cover the pastry with a clean kitchen towel and let rise for 1 hour.
Preheat oven to 425º F.
Brush the risen pastries with the egg wash and bake in the preheated oven for 15 to 18 minutes. Serve warm or at room temperature.
Tip: To make dinner rolls, cut the rolled out dough into about 20 triangles and roll the long end down to the tip. Or, just roll the dough into two logs, cut into 2-inch slices and bake the rolls on a parchment lined sheet pan or in greased muffin cups. Bake the same amount of time as for the pain chocolat.


 Kitchen Counter Point: This recipe is a basic croissant dough. In baking circles it is called a laminated dough because the butter is actually sandwiched between many layers. When the pastry bakes, the butter melts and creates steam, which causes the layers to rise and form that delectable flaky texture. Though this dough does take some time to make, it is mostly just rising. cooling or hands off time. I usually begin the process a day ahead and make the pastry through all of the “turns”. After a night in the frig, the dough is ready to be rolled out and shaped into either pain chocolat or butter rolls, your choice.


